Photography in Patagonia in Autumn

I just returned from leading a two-week photography expedition through Patagonia — Los Glaciares National Park and Torres del Paine, with my group based in tents at the foot of Fitz Roy and at Río Serrano. April. Autumn. The season most photographers don't even consider when they think about Patagonia.
They should.
This is a practical guide to photographing Patagonia in autumn — based on years of leading expeditions in the region, with notes from the trip I just finished. I'll cover what autumn actually looks like, the locations that work best in this season, the realities of weather and light, and how to plan a trip that respects both the landscape and the people who live in it.
If you want a short framework to help you compose stronger landscape images on the spot, you can grab my free composition guide The Field Method — Four checks I run before every shot
Why autumn is the best-kept secret of Patagonia photography
Most photographers who travel to Patagonia book the high summer — December, January, February. The light is dramatic, the days are long, the famous viewpoints are at peak postcard form.
They are also at peak crowd.
Autumn is different. The lenga forests turn red and gold. The first snow falls on the higher peaks while the valleys still hold warm colour. The light angles drop lower, carving better depth into the landscape. The crowds thin out dramatically. And the famous spots that get hammered in summer start to feel like wilderness again.
But autumn in Patagonia is also harder. The weather is less predictable. The wind, already legendary in summer, gets more aggressive. Daylight hours shorten quickly through April and May. Some access roads start to deteriorate. And the moments of extraordinary light arrive on their own schedule, often without warning.
This is the season that rewards photographers who are willing to work for it.

Telephoto capture of the Fitz Roy massif at sunset in autumn. There´s plenty to shoot without any hiking too…
What autumn light looks like in Patagonia
The technical reality first.
In autumn, the sun is lower in the sky. Sunrise and sunset light lasts longer. Golden hour stretches into something closer to golden 90 minutes when conditions cooperate. The hard, top-down summer light gives way to side-light and rim-light that defines edges and textures beautifully.
Blue hour — the window between sunset and full darkness — also extends. This matters for landscape photographers because it gives you more time to make a frame work when the dramatic light fails (which, in Patagonia, it often does).
The weather is its own factor. In April and early May, you'll often get storm fronts rolling through with breaks that last just minutes. A sudden gap in the clouds can ignite a peak in light for thirty seconds before everything closes again. You learn to stay longer than feels reasonable. The best frames usually arrive last.
The cars going to and leaving El Chaltén used as storytelling element in this dynamic sunrise capture
A note on responsible photography in Patagonia
Before the locations — this matters.
Patagonia is not a theme park. The national parks are real ecosystems with real fragility. The towns — El Chaltén, Puerto Natales, Torres del Paine's surrounding ranches — are real communities. The Gauchos who work this landscape are not props for our photographs. They have lived and worked here for generations, often in ways that haven't fundamentally changed in a century.
Some basic principles I teach on every phototour:
Stay on marked trails. The vegetation here recovers slowly, and a footprint off the path can scar the ground for years. If you have an accredited mountain guide with you, they will judge the situation for you. Photo tours are required to hire a mountain guide throughout the entire activity — these guys are great at what they do. Respect them, and respect nature.
Never park on the road for "a quick shot." Patagonian roads are narrow, often gravel, and locals depend on them. A stopped vehicle in the wrong place can cause real accidents.
Respect private land. If a fence is up, it means something. Ask before crossing into estancias or working ranches.
If you photograph Gauchos or any locals, ask first. Better yet, arrange a session through the proper channels — the family or ranch usually has someone who facilitates this respectfully and gets paid fairly for it.
Pack out everything. This includes microtrash. Granola bar wrappers, lens cloths, anything.
If we want Patagonia to remain accessible to photographers, this is the cost of admission.
Best photography locations in Patagonia for autumn
I'm organizing these by region — Los Glaciares (around El Chaltén) and Torres del Paine. These are the two photographic centres of gravity in southern Patagonia, and both work well in autumn for different reasons.
Los Glaciares National Park (El Chaltén area), Argentina

At laguna de los tres you can really feel that you are just under the mighty Fitz Roy massif!
El Chaltén is a small mountain town in Argentina that serves as the base for hiking and photographing the Fitz Roy and Cerro Torre massifs. In autumn, the lenga forests around the town turn red. The peaks usually get their first dustings of fresh snow. And the crowds thin significantly compared to summer.
Laguna Capri

The Fitz Roy massif emerges from the shore of Laguna Capri on a cold autumn morning
A reasonable hike from El Chaltén — about an hour and a half each way. Less crowded than Laguna de los Tres but with a strong view of Fitz Roy reflecting in the lake.
What we shoot here: classic reflection shots, foreground lake details, the peak rising behind autumn forest. Best light: sunrise for alpenglow, or storm-break light at any time of day. Autumn note: in April the lake water gets very cold and reflections become glassy on still mornings. Worth getting there before dawn to scout your foreground while the light builds. Lenses: 16–35mm for wide reflection compositions; 24–70mm for cleaner framing.
Laguna Torre
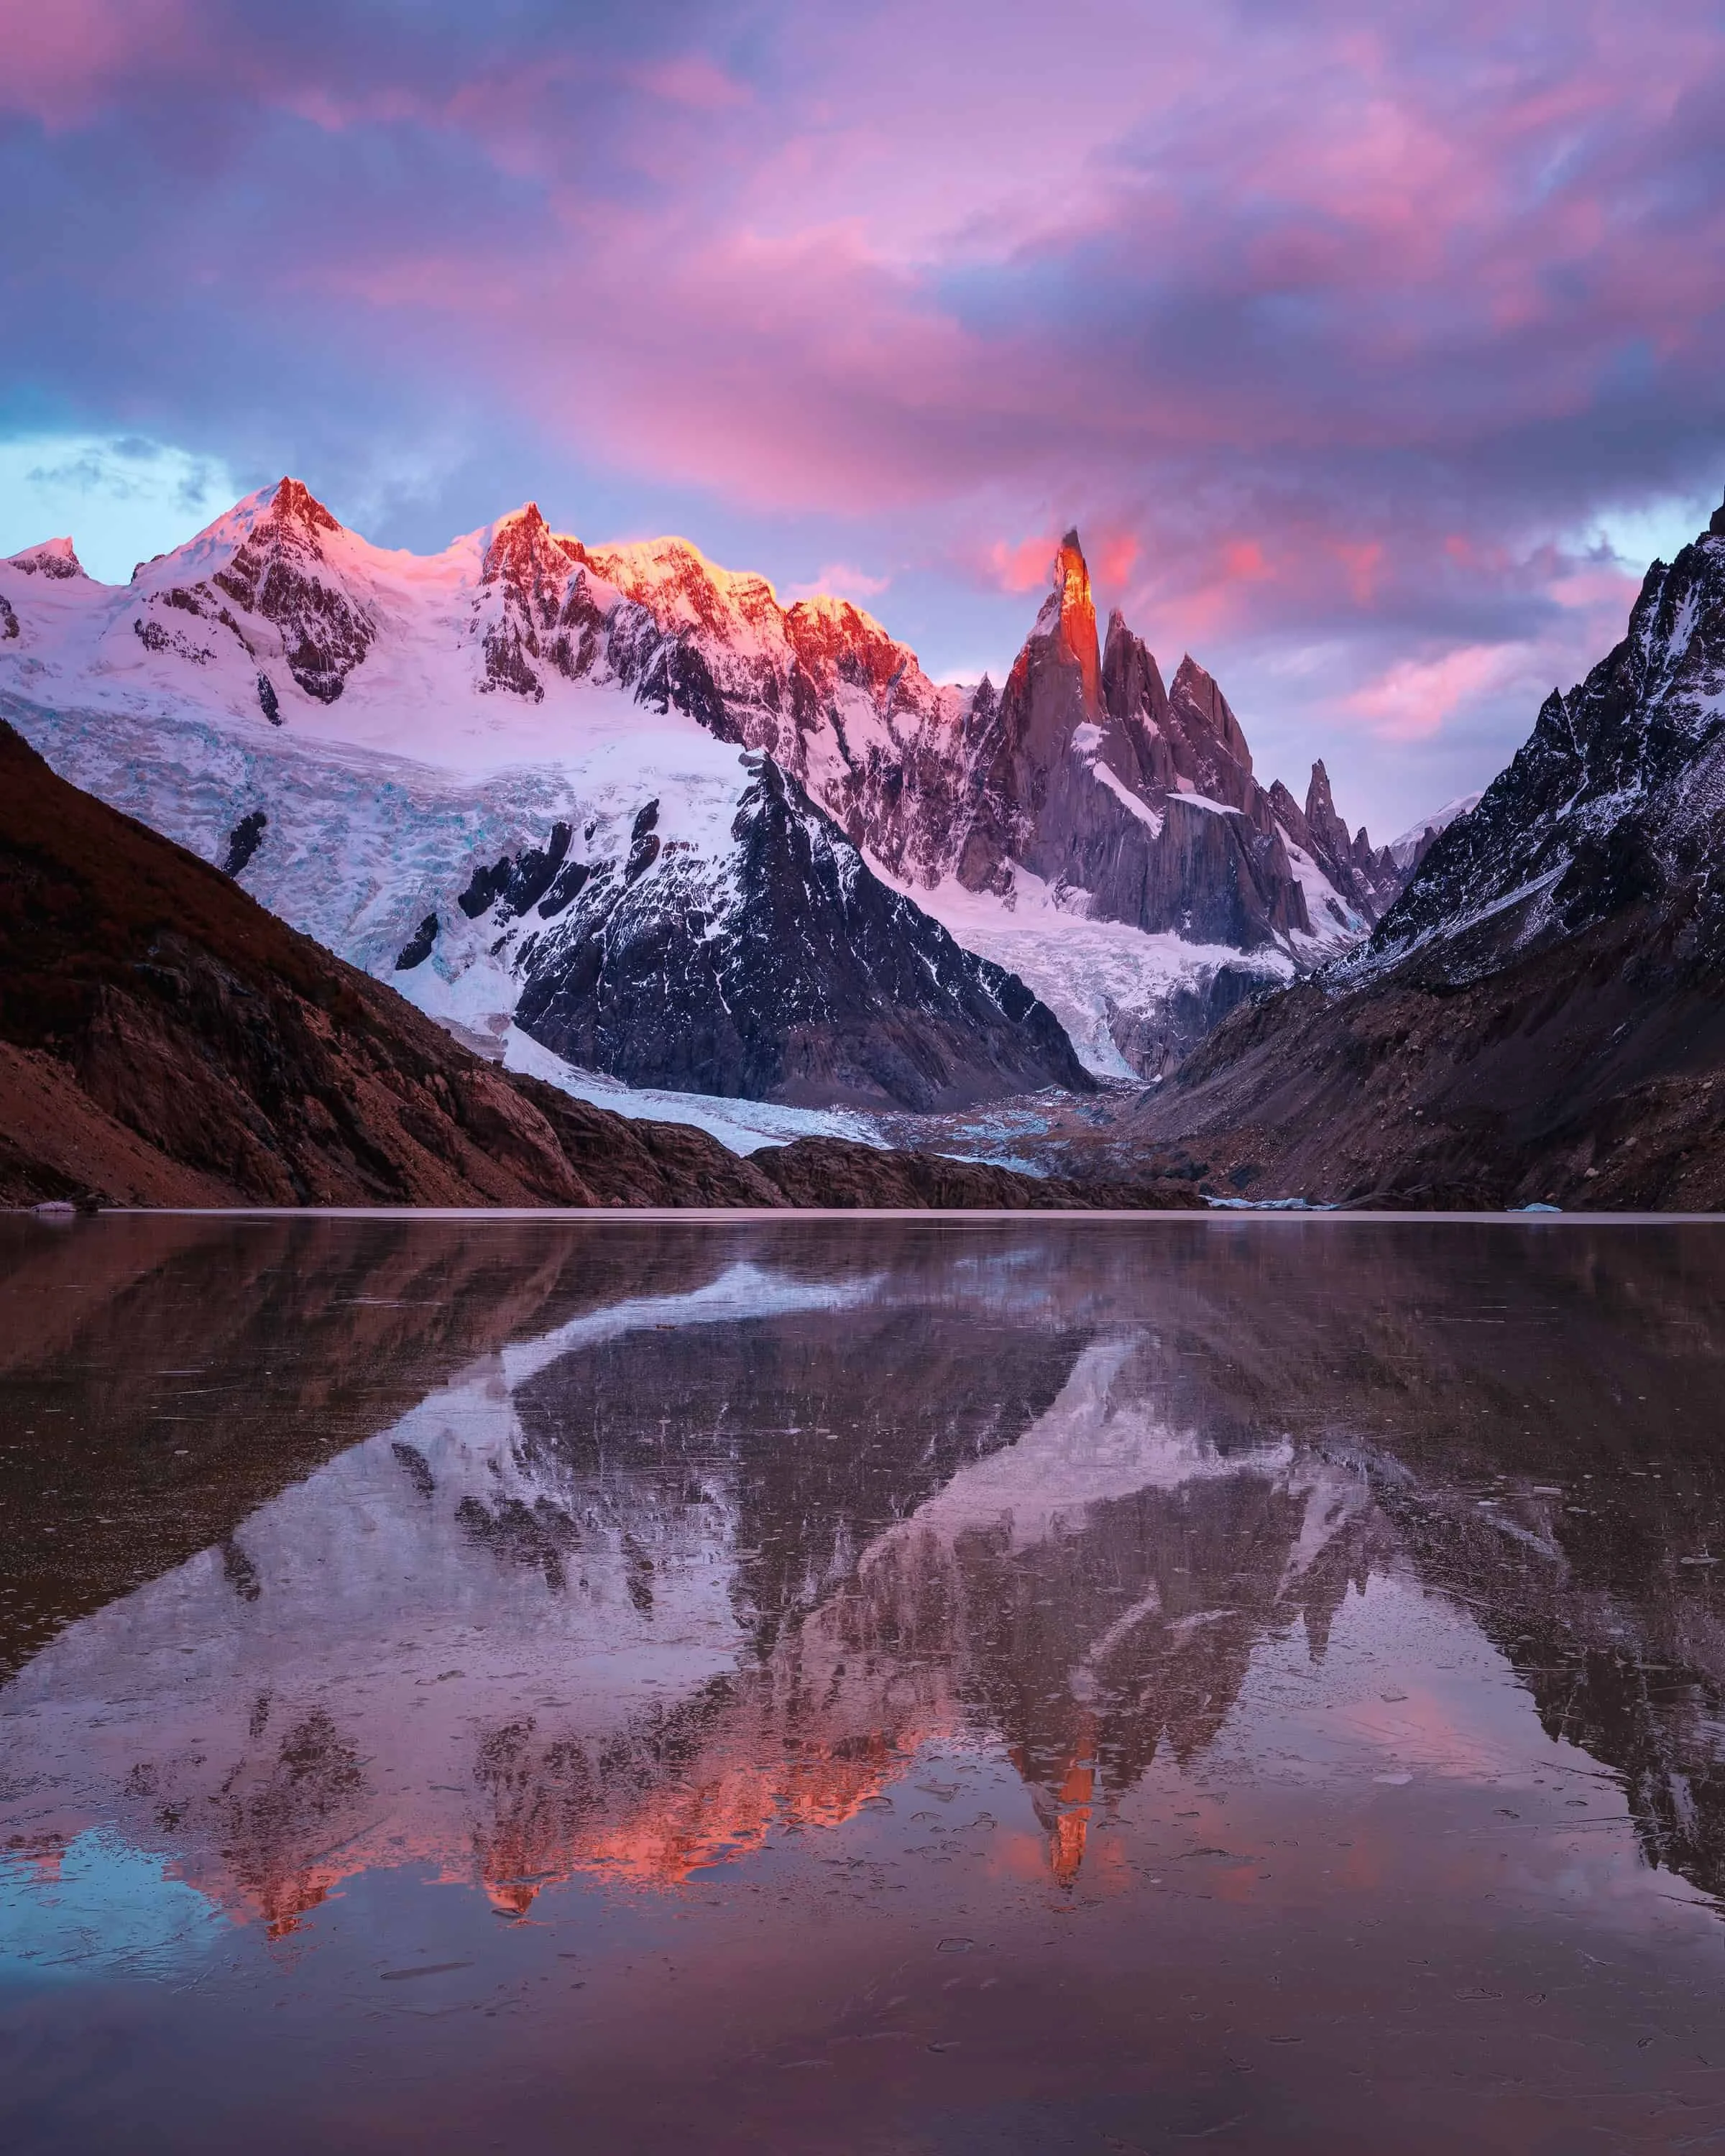
The mighty Cerro Torre reflecting in a still lagoon is a rare and wonderful sight
The hike out to Laguna Torre takes you toward Cerro Torre — the more dramatic, more difficult, less-photographed cousin of Fitz Roy. The trail is roughly 18km return with moderate elevation, and the laguna sits at the foot of the glacier with the spires rising behind.
What we shoot here: Cerro Torre and the surrounding spires reflected (when calm) or framed against storm cloud, glacial ice in the lake foreground, the otherworldly atmosphere this location holds when conditions cooperate. Best light: Cerro Torre is notoriously stubborn — it sits in cloud more often than not. The reward when it clears is one of the most dramatic alpine views on earth. Patience required. That said those that hike out early through the night can get the maximal reward when the alpenglow starts setting the spires on fire. Autumn note: the trail can be muddy or icy depending on the conditions. Worth checking with guides in town before committing. Fewer hikers in autumn means a quieter, more contemplative experience at the laguna. Lenses: 16–35mm for environmental shots with foreground ice; 24–70mm for cleaner framing; 70–200mm for isolating the spires against the sky.
Laguna de los Tres

Those that venture out to Laguna de los tres for sunrise can be in for a real treat!
The famous one. The hike is long and hard (around 10km each way with significant elevation gain near the end), and in autumn the trail can be icy on the final steep section. But if you commit, the view is one of the great alpine spectacles in the world.
What we shoot here: the full Fitz Roy massif rising directly from the lake, foreground rock and ice, dramatic ridgelines. Best light: sunrise. The peak catches alpenglow that lasts only minutes. Autumn note: Be prepared for real cold at the top including the trail beeing frozen over on cold mornings. Pack microspikes if it´s been cold! Layer aggressively. The wind at the laguna can be ferocious even on otherwise calm days. Watch the trail conditions before you commit — guides in El Chaltén will tell you honestly if it's currently doable. Lenses: 16–35mm for the full vista; 24–70mm for tighter compositions; 70–200mm for compressing the spires.
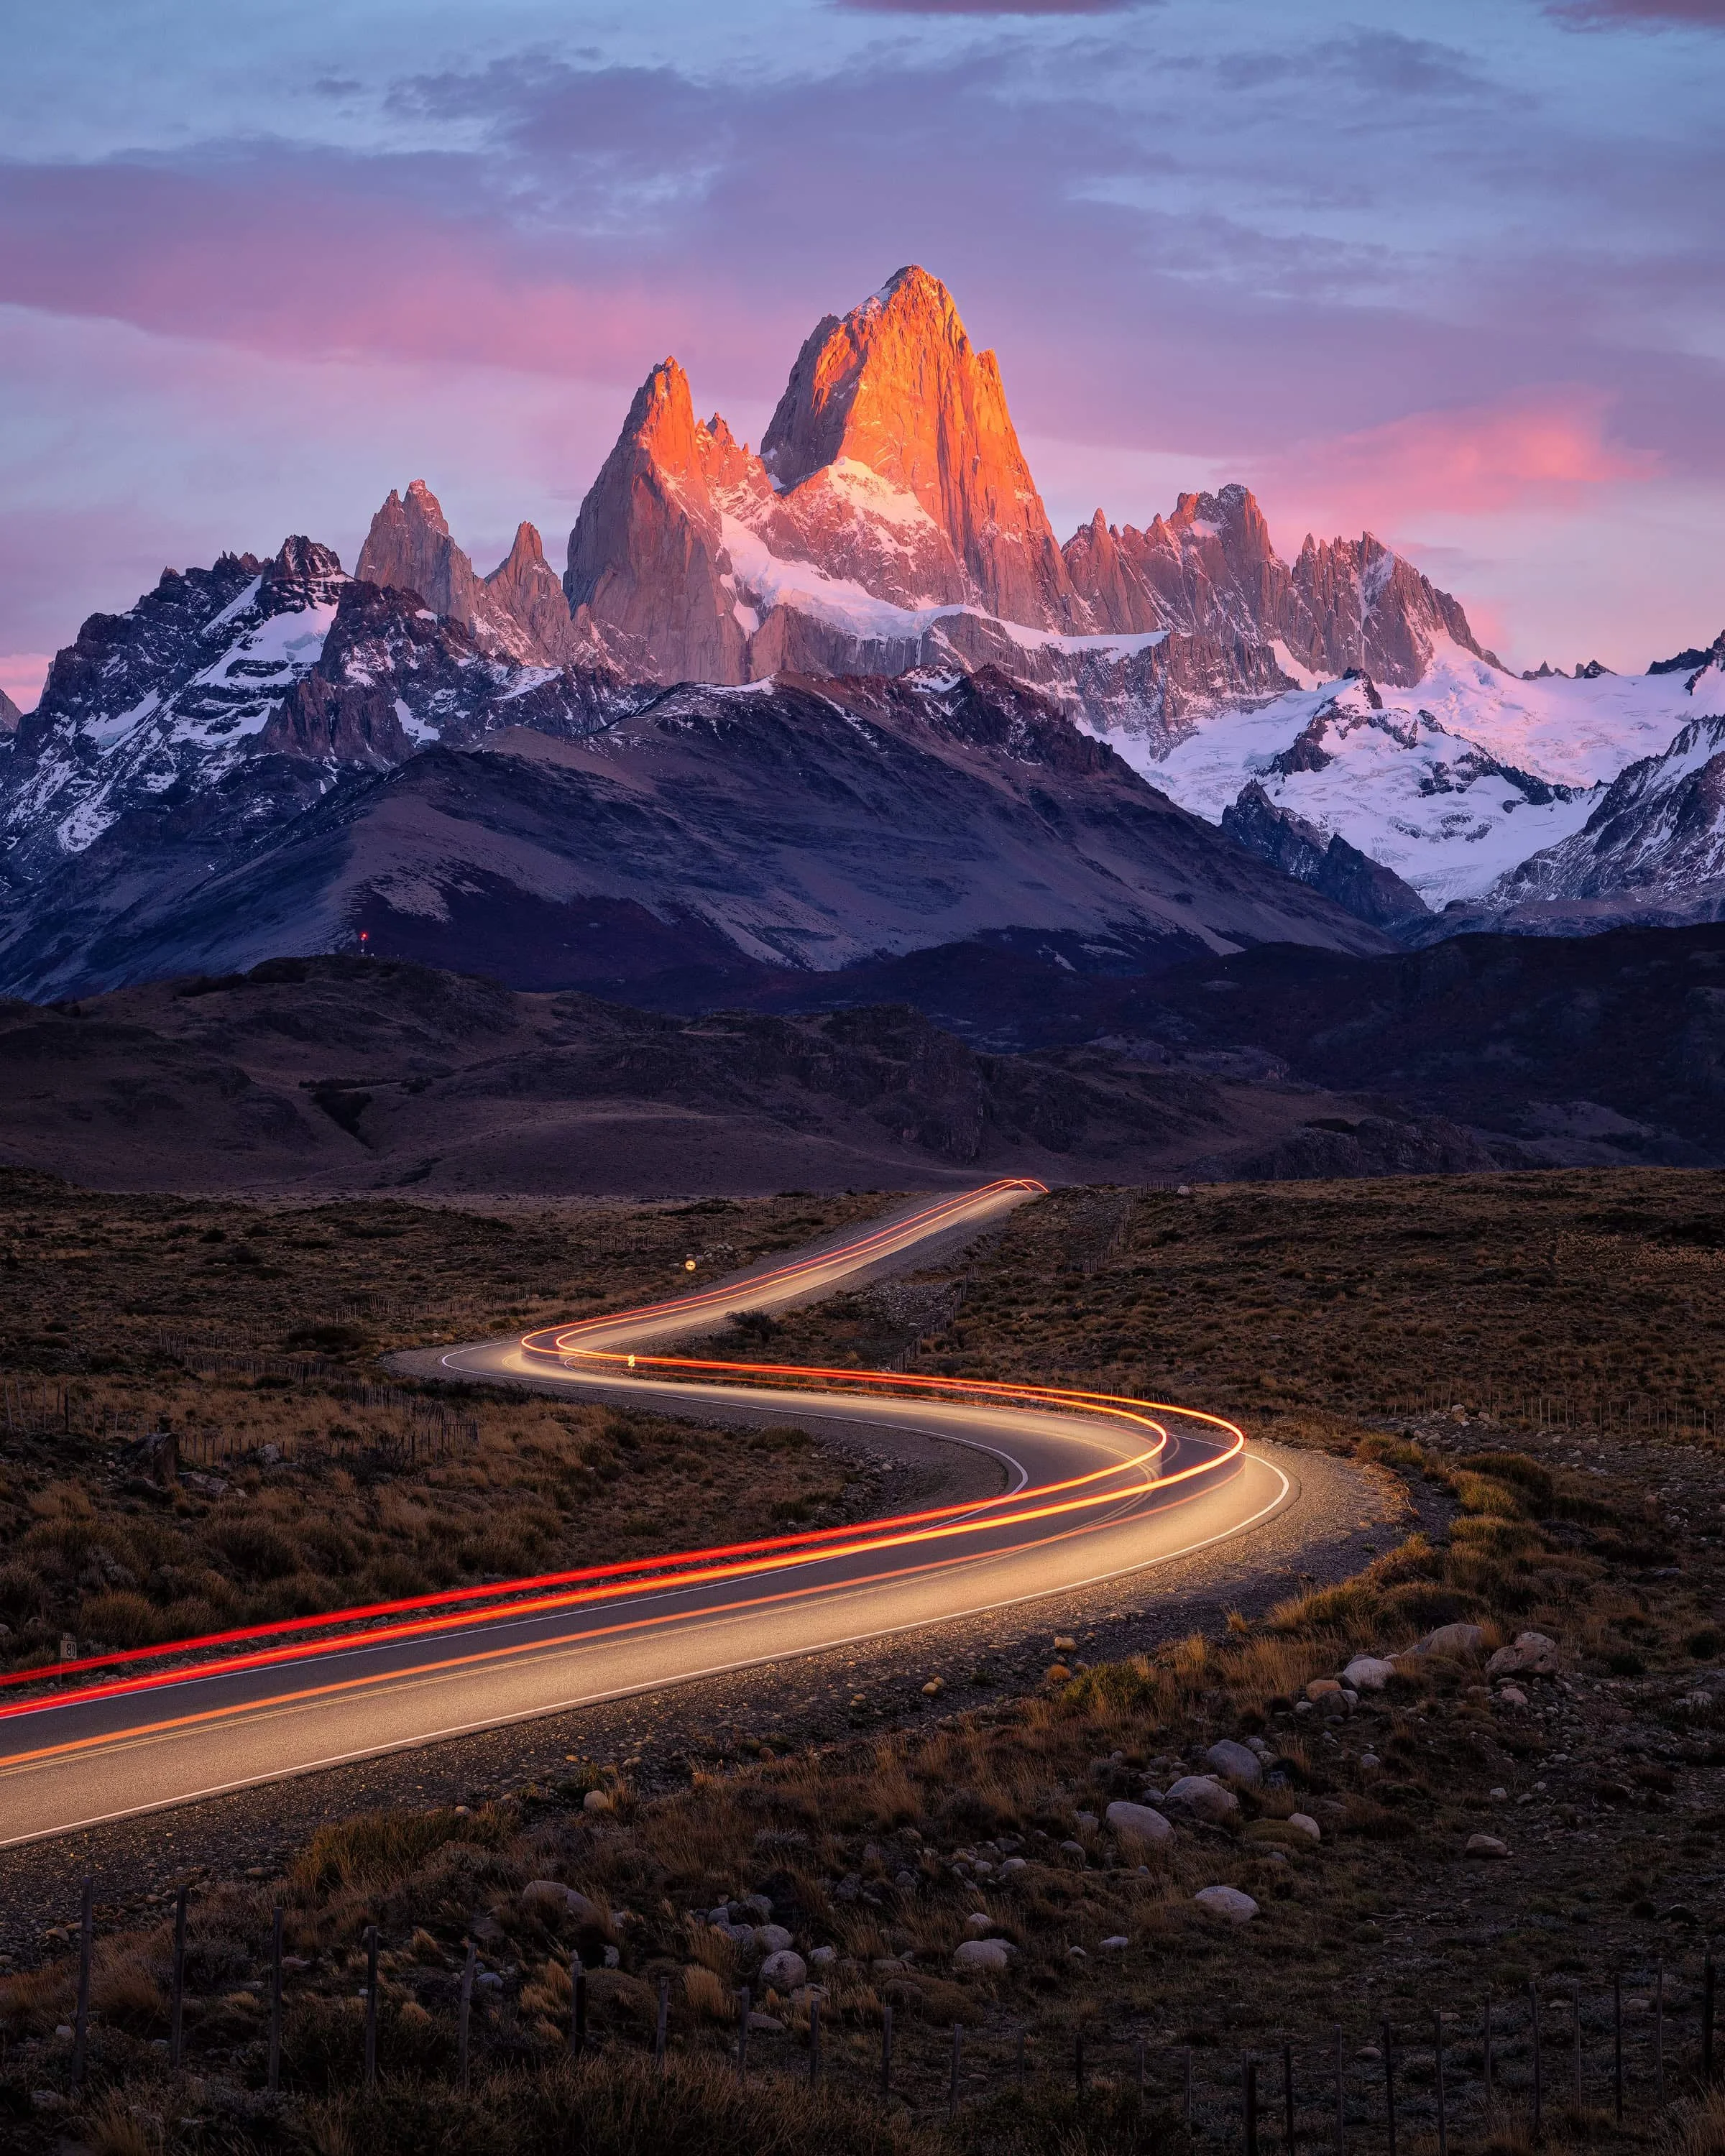
Ruta 23 and the road south of El Chaltén

If you go to El Chaltén, Argentina then adventure awaits you. If you leave… i hope you had an awesome time!
This is where the car trail / road shots that have become iconic of Patagonia happen. The stretch of road south of El Chaltén offers Fitz Roy with the road snaking into the foreground.
What we shoot here: road as leading line, light trails at blue hour, panoramic compositions with the full massif. Best light: blue hour into early sunrise. Long exposures of car lights at the right moment can transform the scene. Autumn note: there is less traffic in autumn — this is both a benefit (less chaos) and a challenge (fewer car lights for long-exposure trail shots). You'll need to be patient and shoot multiple frames. Lenses: 24–70mm; 70–200mm for compressed peak compositions.
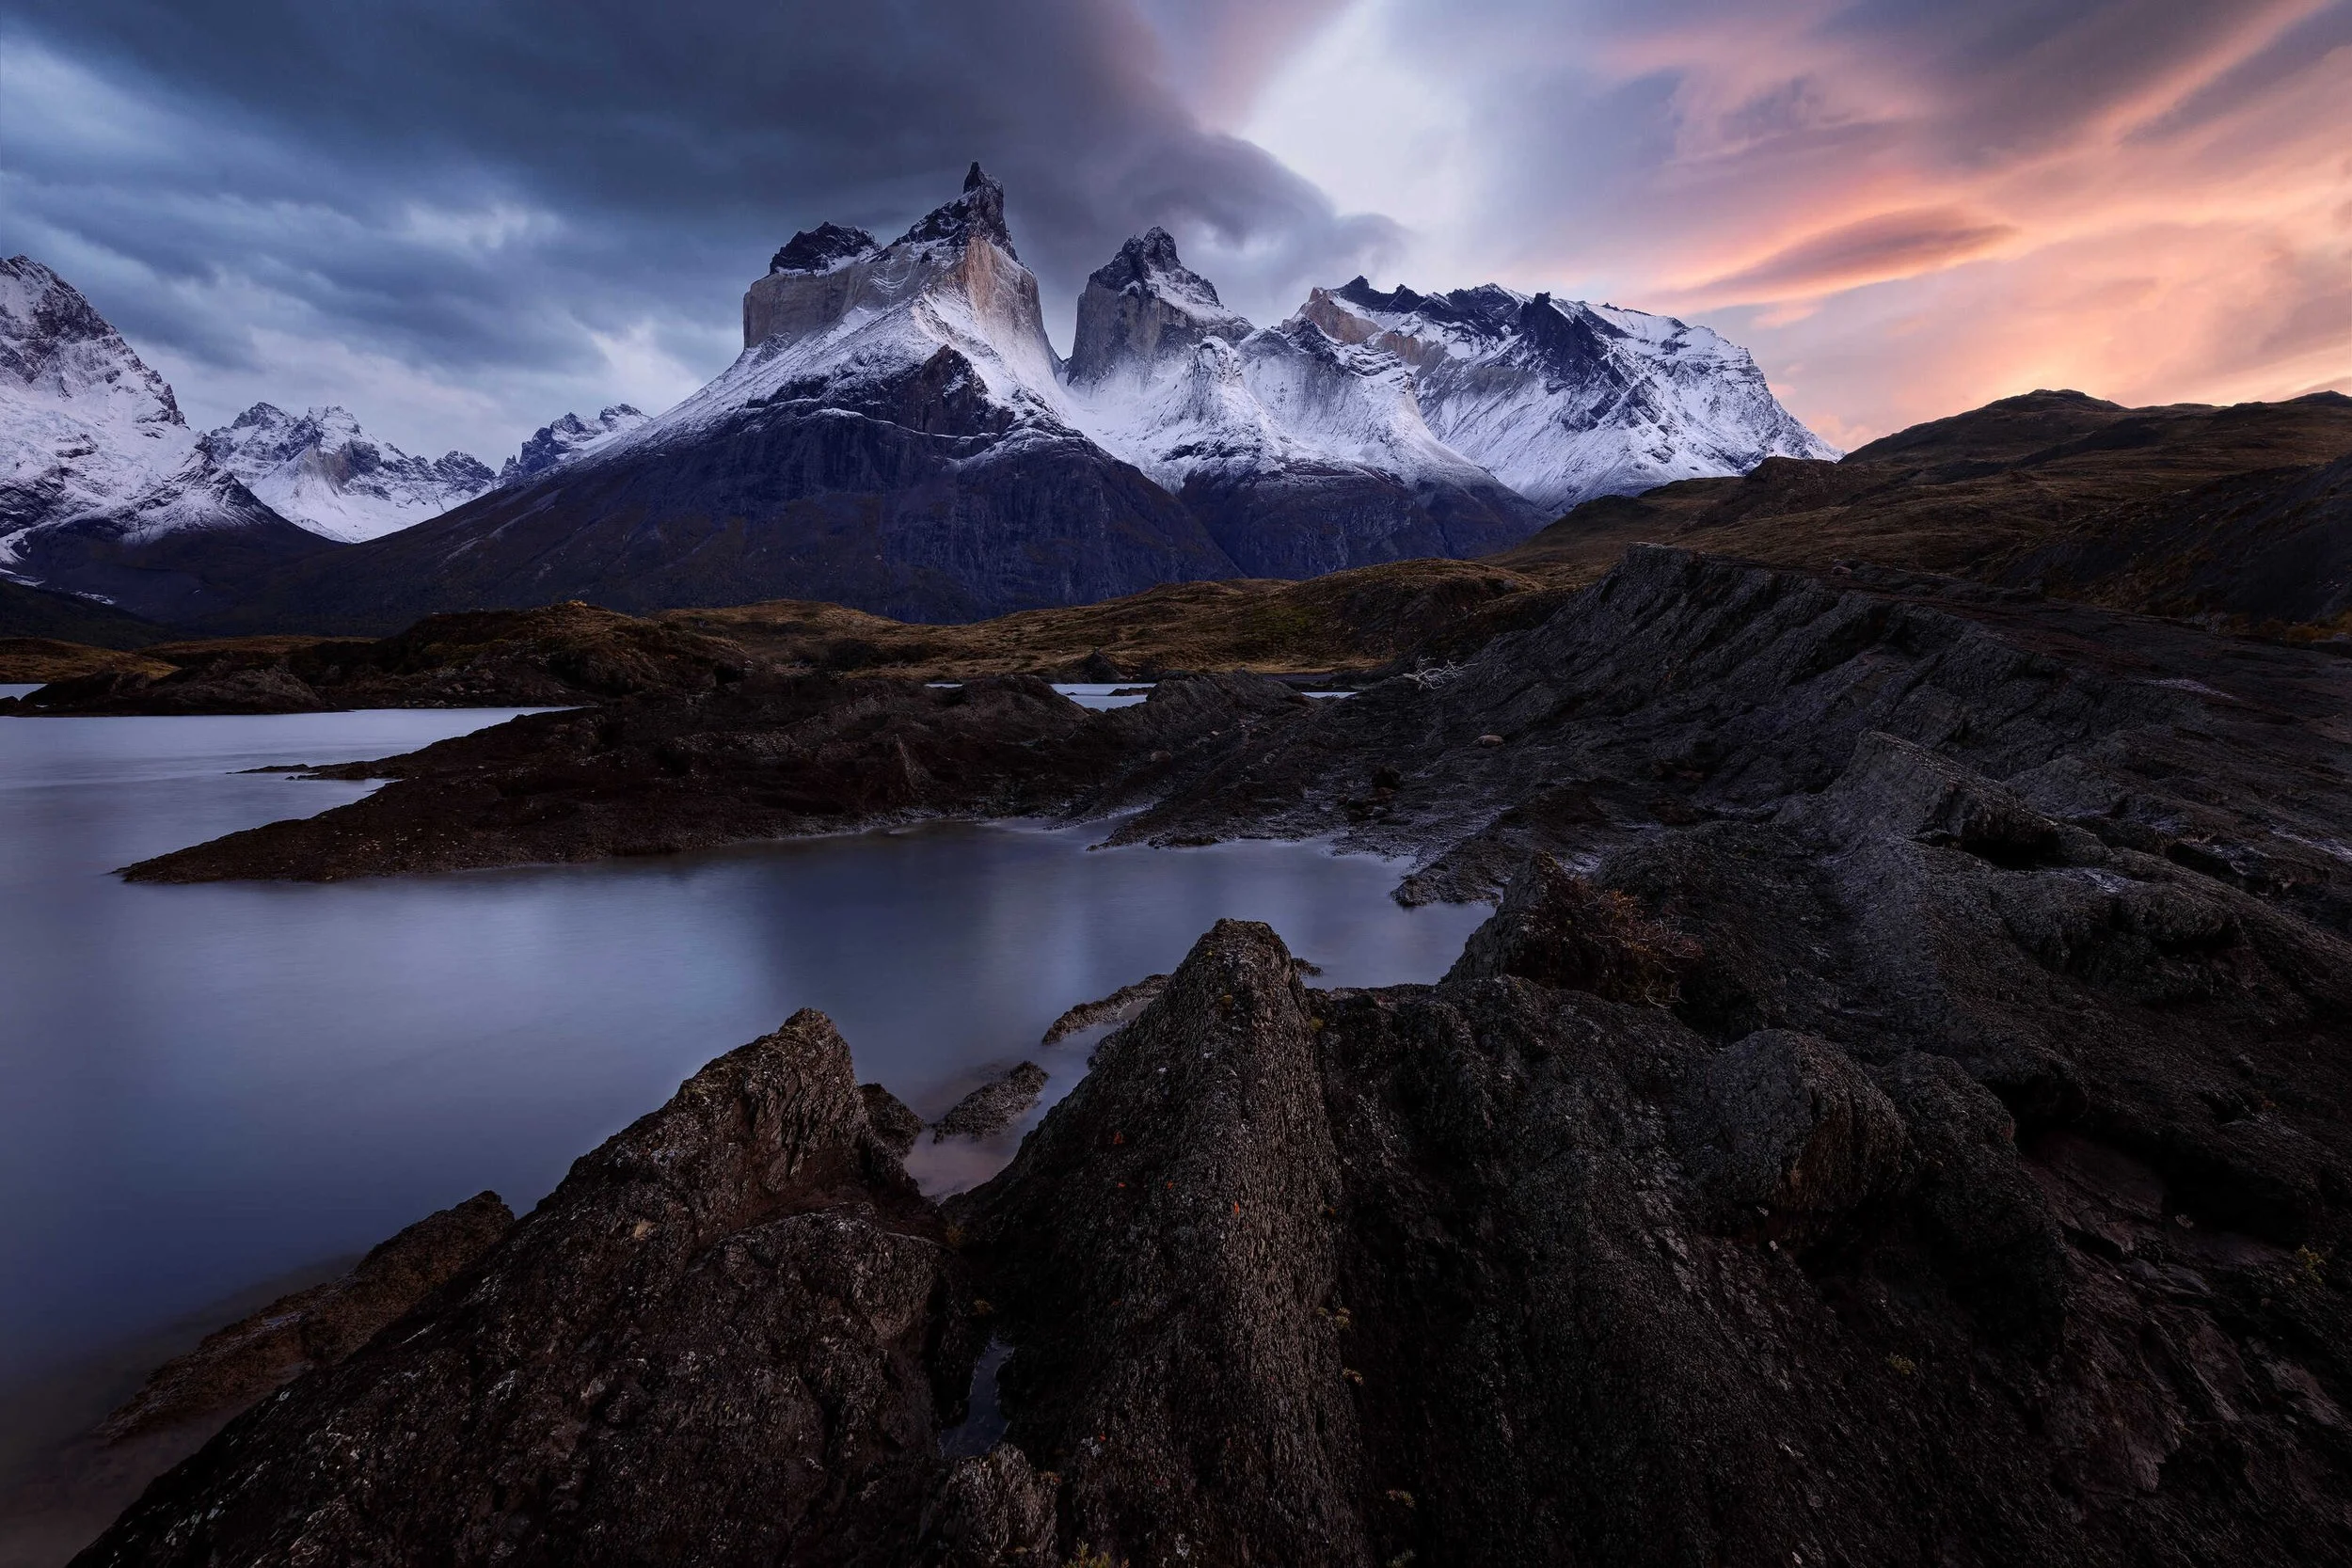
Torres del Paine National Park
A drive (or transfer) from El Chaltén across the border into Chile brings you to Torres del Paine — a completely different mountain range with its own visual character. The Cuernos del Paine and the Torres themselves are the signature subjects, but the park has far more to offer than its two famous viewpoints.
One important note before the locations. Torres del Paine has been hit by major fires in recent years — the most devastating in 2011–2012 destroyed roughly 17,000 hectares of native forest, and the park has had further significant fires since. As a result, many of the historically best photographic compositions in the park are currently inaccessible. Burnt zones are closed to allow regrowth, and the lenga and ñire that take decades to recover are now under active restoration.
This matters practically: in Torres del Paine, stay on the marked trails. Off-trail movement in burn-recovery zones causes real, lasting damage to fragile regrowth. The park rangers enforce this strictly and rightly so. Some of the iconic foregrounds you may have seen in older photographs of the park are no longer possible to recreate from the same vantage point — work with what the park currently offers. Be assuered that you will still find so many incredible foregrounds that you will wish you could stay a month or longer…
Glaciar Grey — Mirador de los Hielos
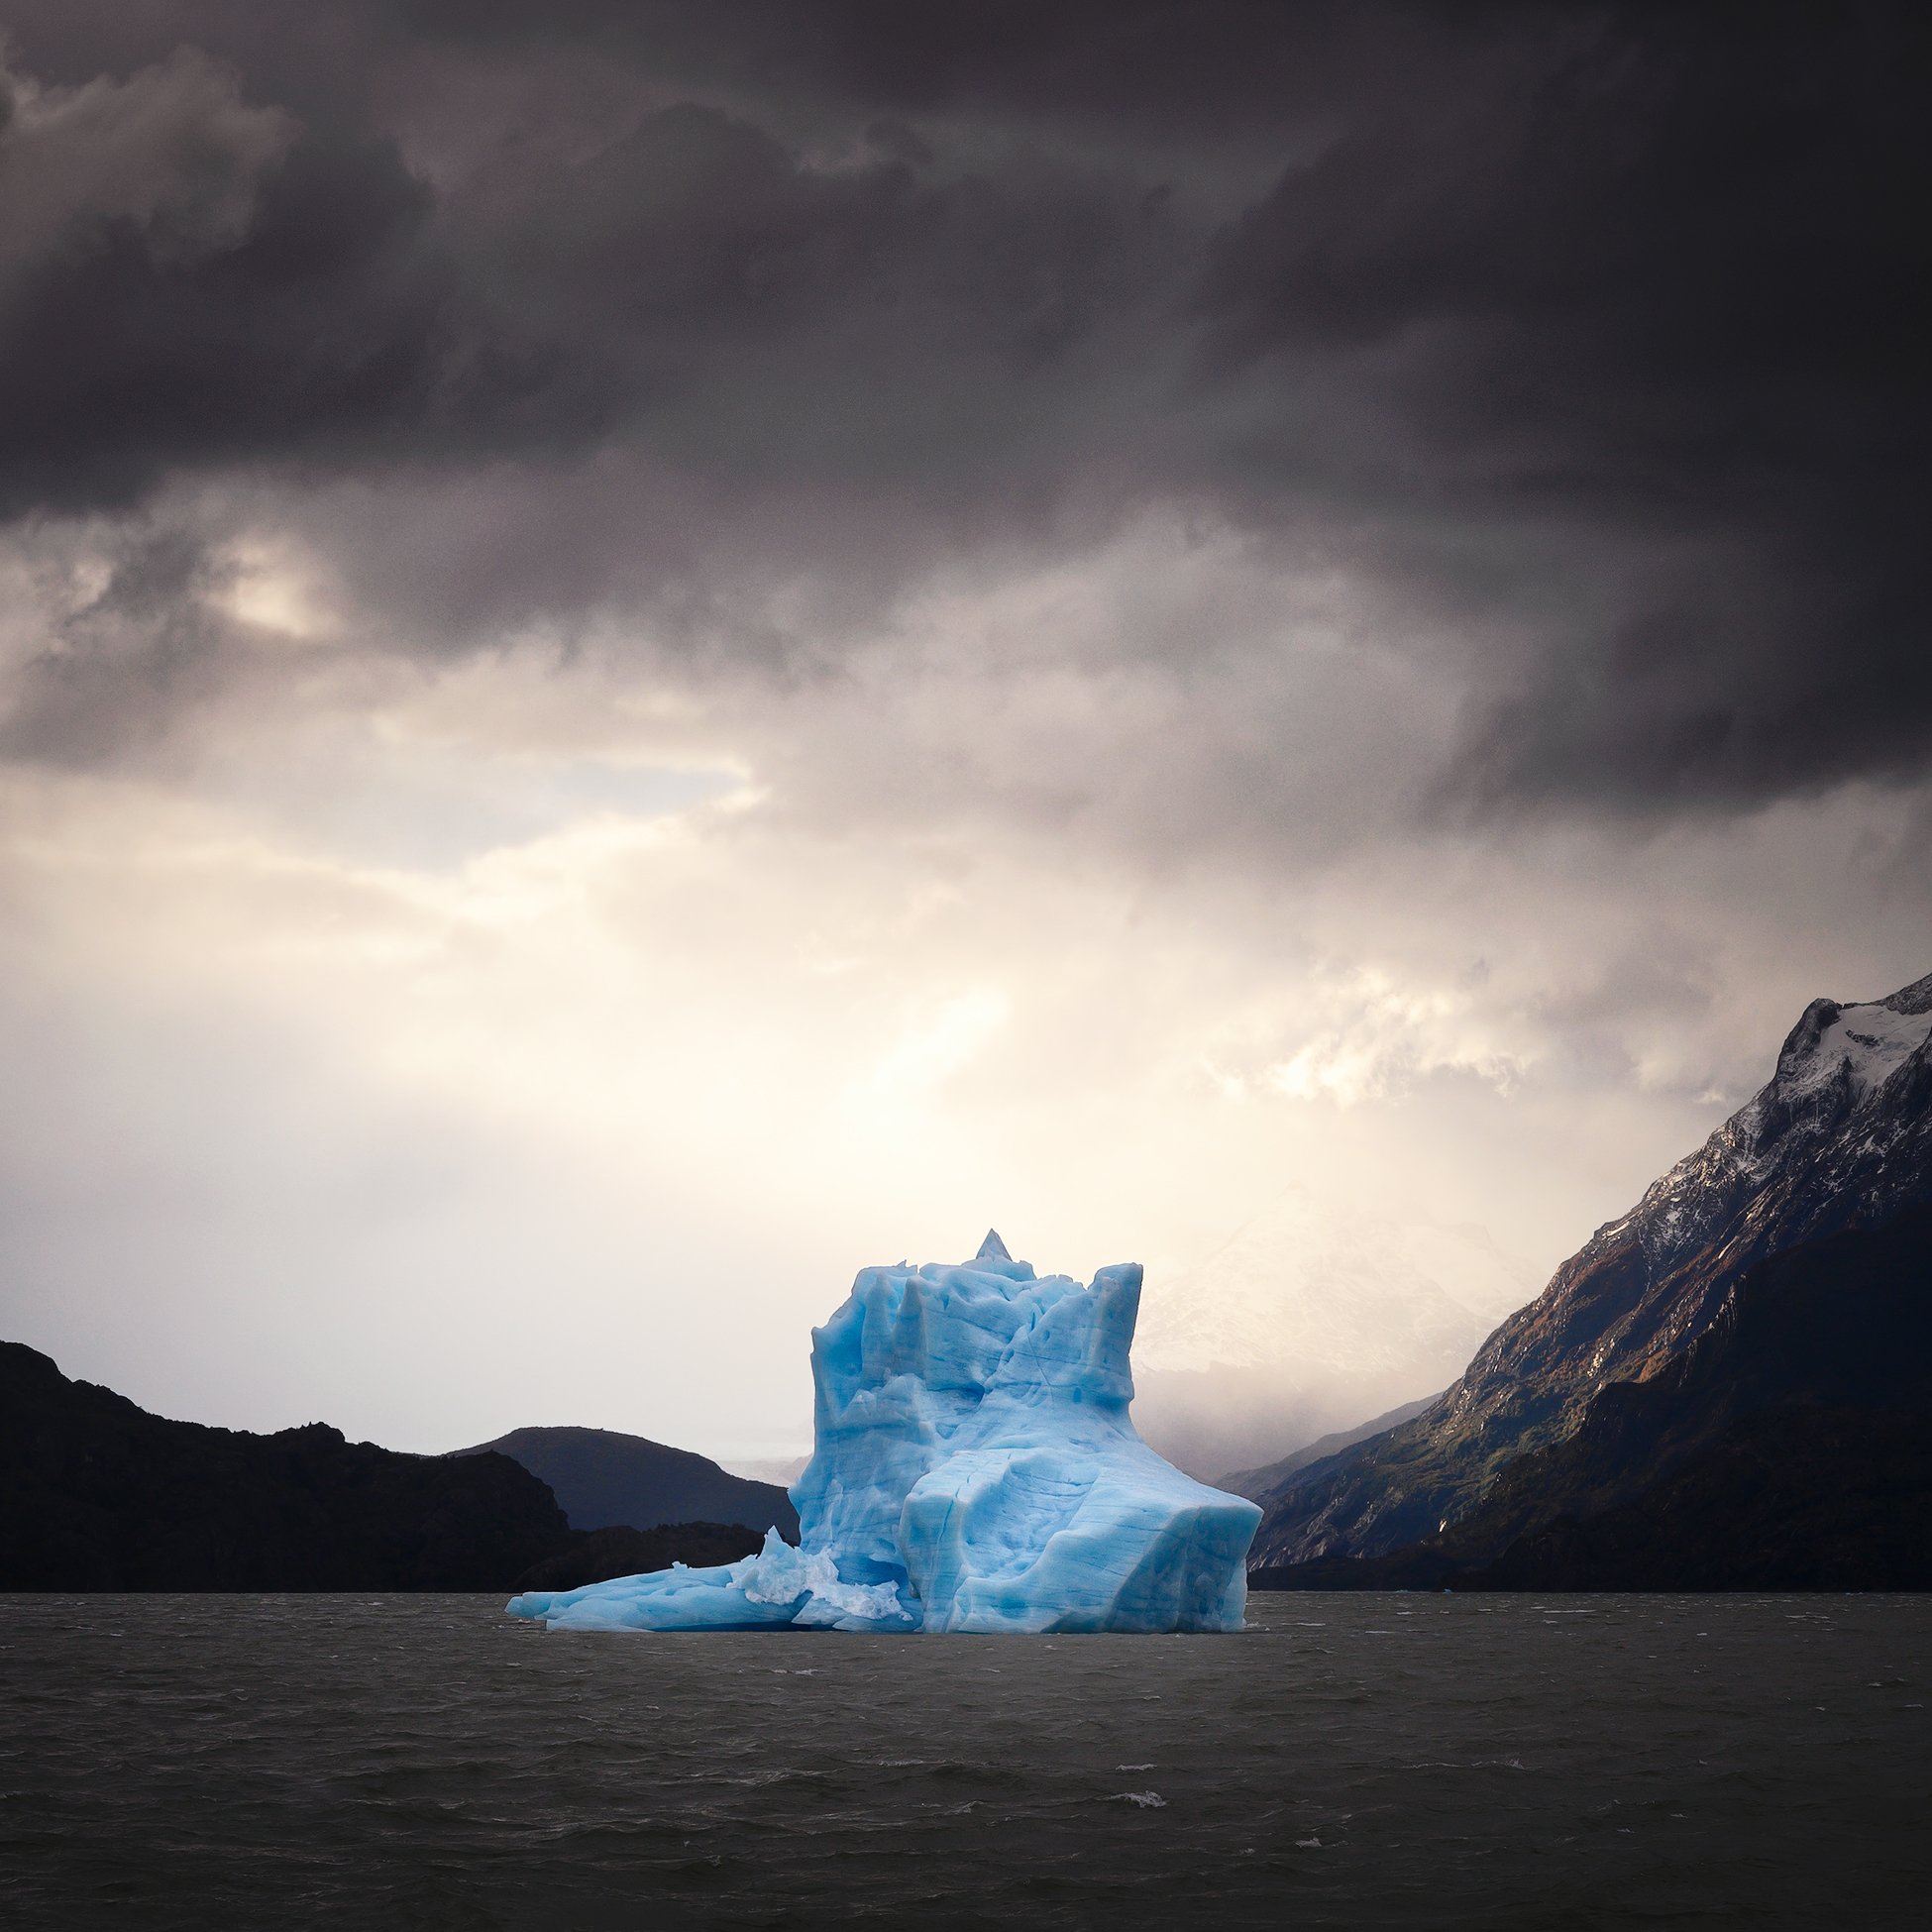
The glacier itself is one of the great spectacles of the park, but you don't need to commit to the multi-day W trek to photograph it. The short hike up to Mirador de los Hielos gives you the glacier, icebergs floating in Lago Grey, and the surrounding peaks all in one frame.
What we shoot here: the glacier across the lake, icebergs as foreground or middle elements, the layered ridgelines of the Paine massif catching light. Best light: morning works particularly well — the sun rises behind the viewpoint, lighting the glacier face and peaks beyond. Late afternoon also offers atmospheric backlight on the ice. Autumn note: the surrounding lenga turns to red and gold in April, giving you warm foreground colour against the cold blues of the glacier and lake. Worth being there for both ends of the day. Lenses: 24–70mm for the wider scene with foreground; 70–200mm for isolating the glacier face and icebergs; 100–400mm for tight compression shots of ice detail.
Camping Pehoé
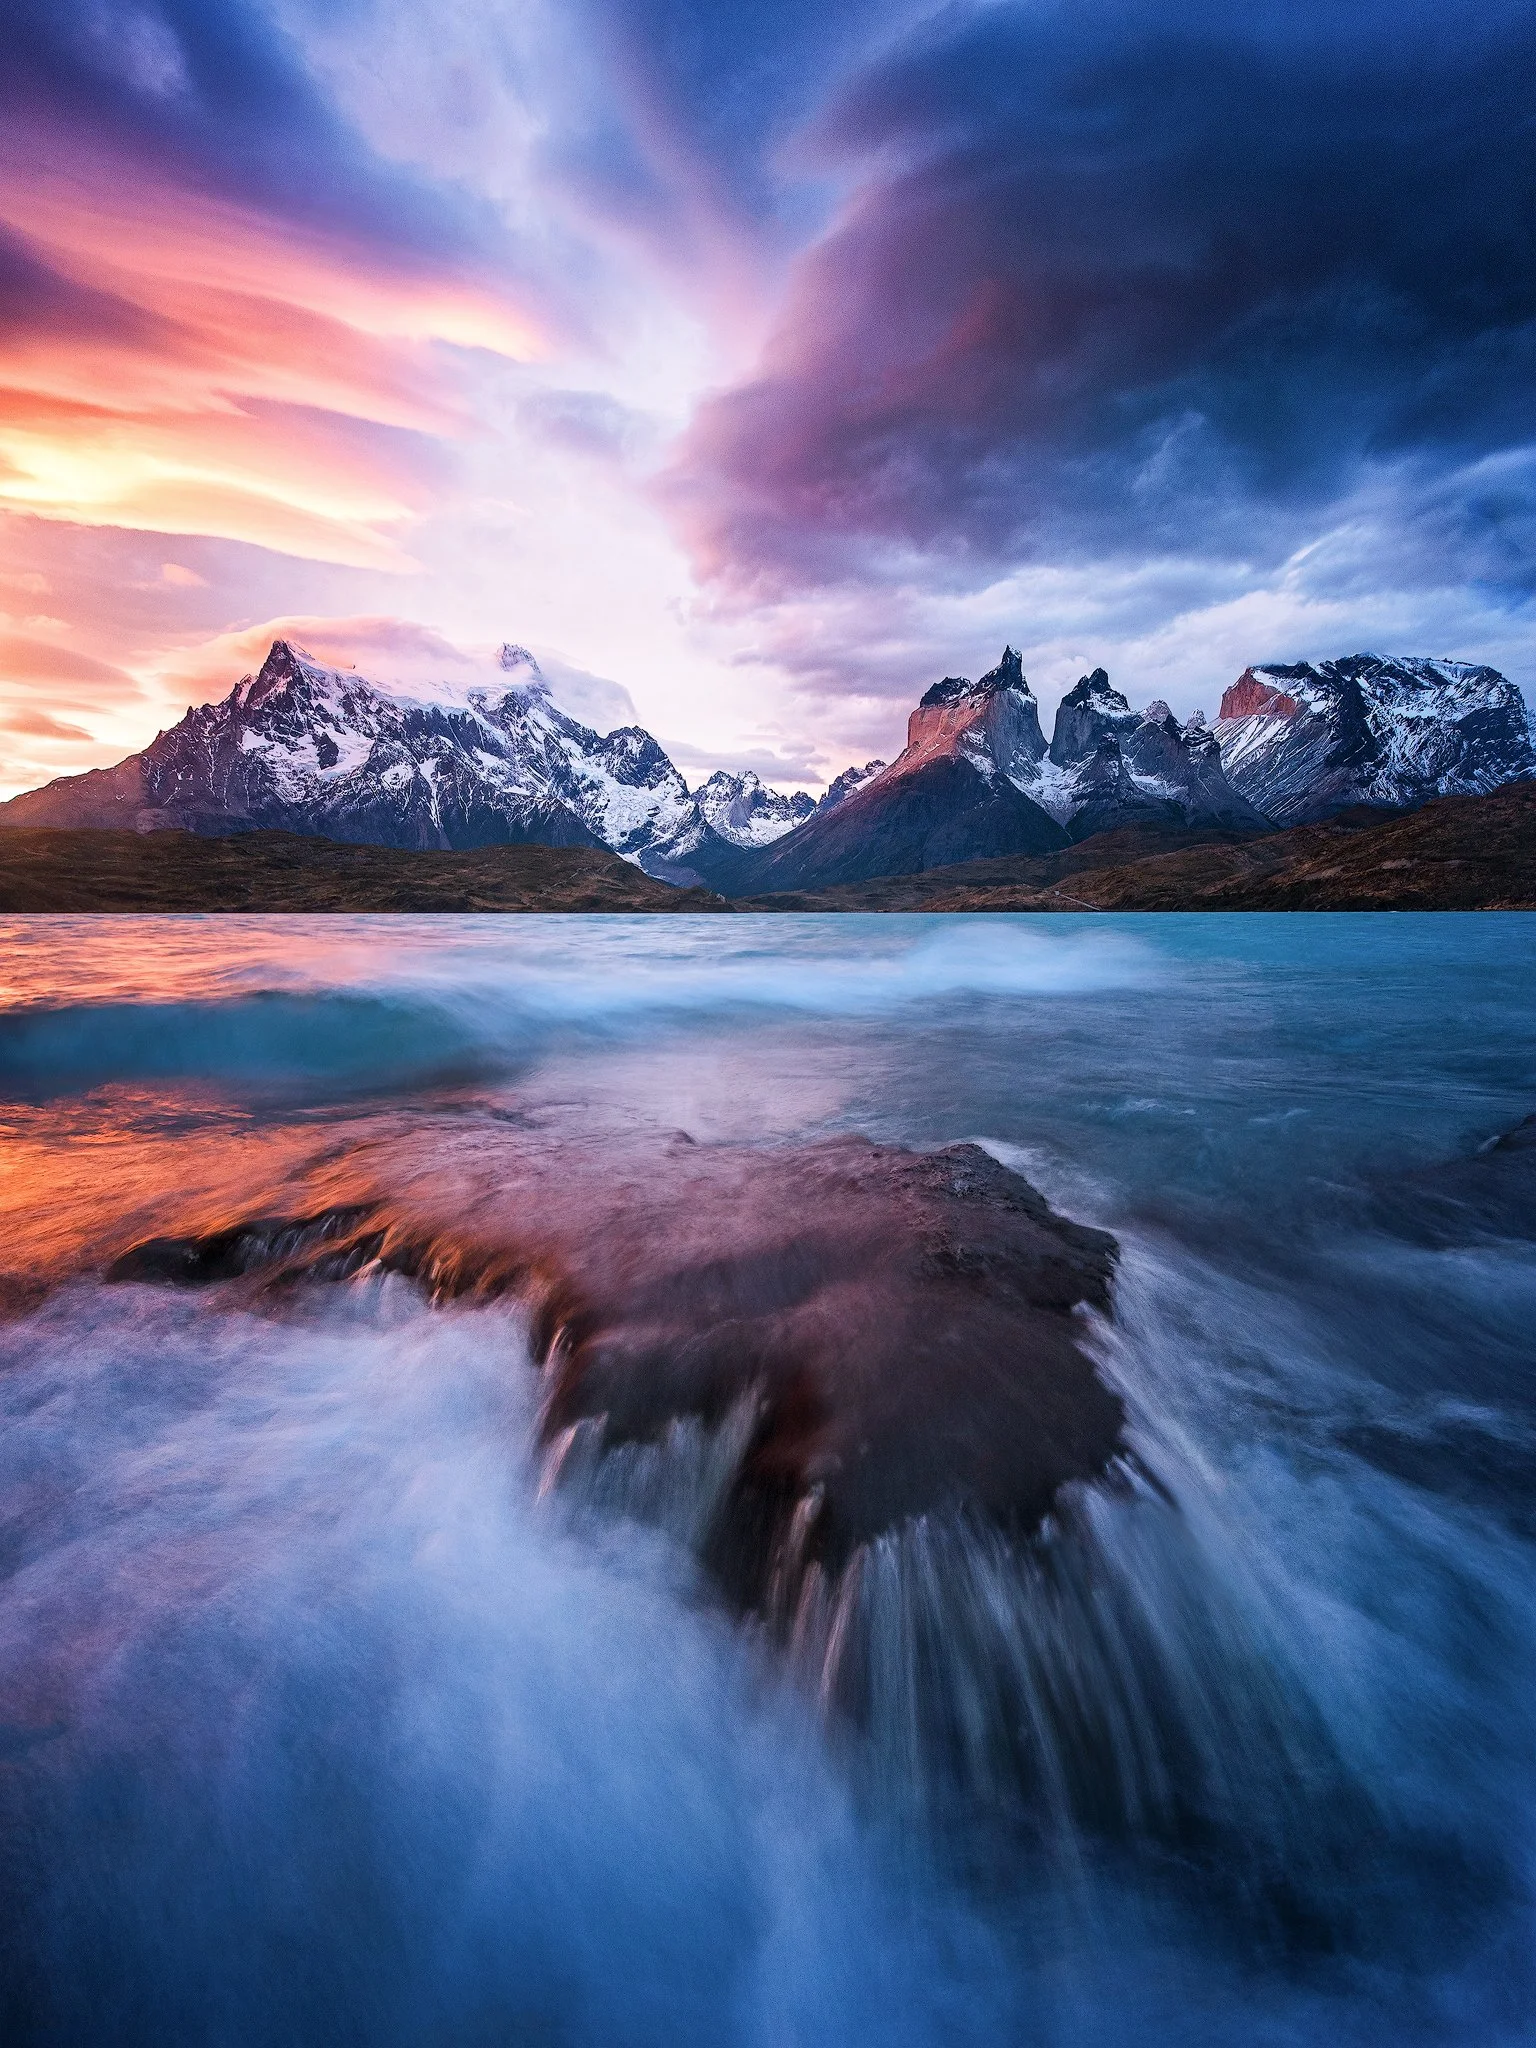
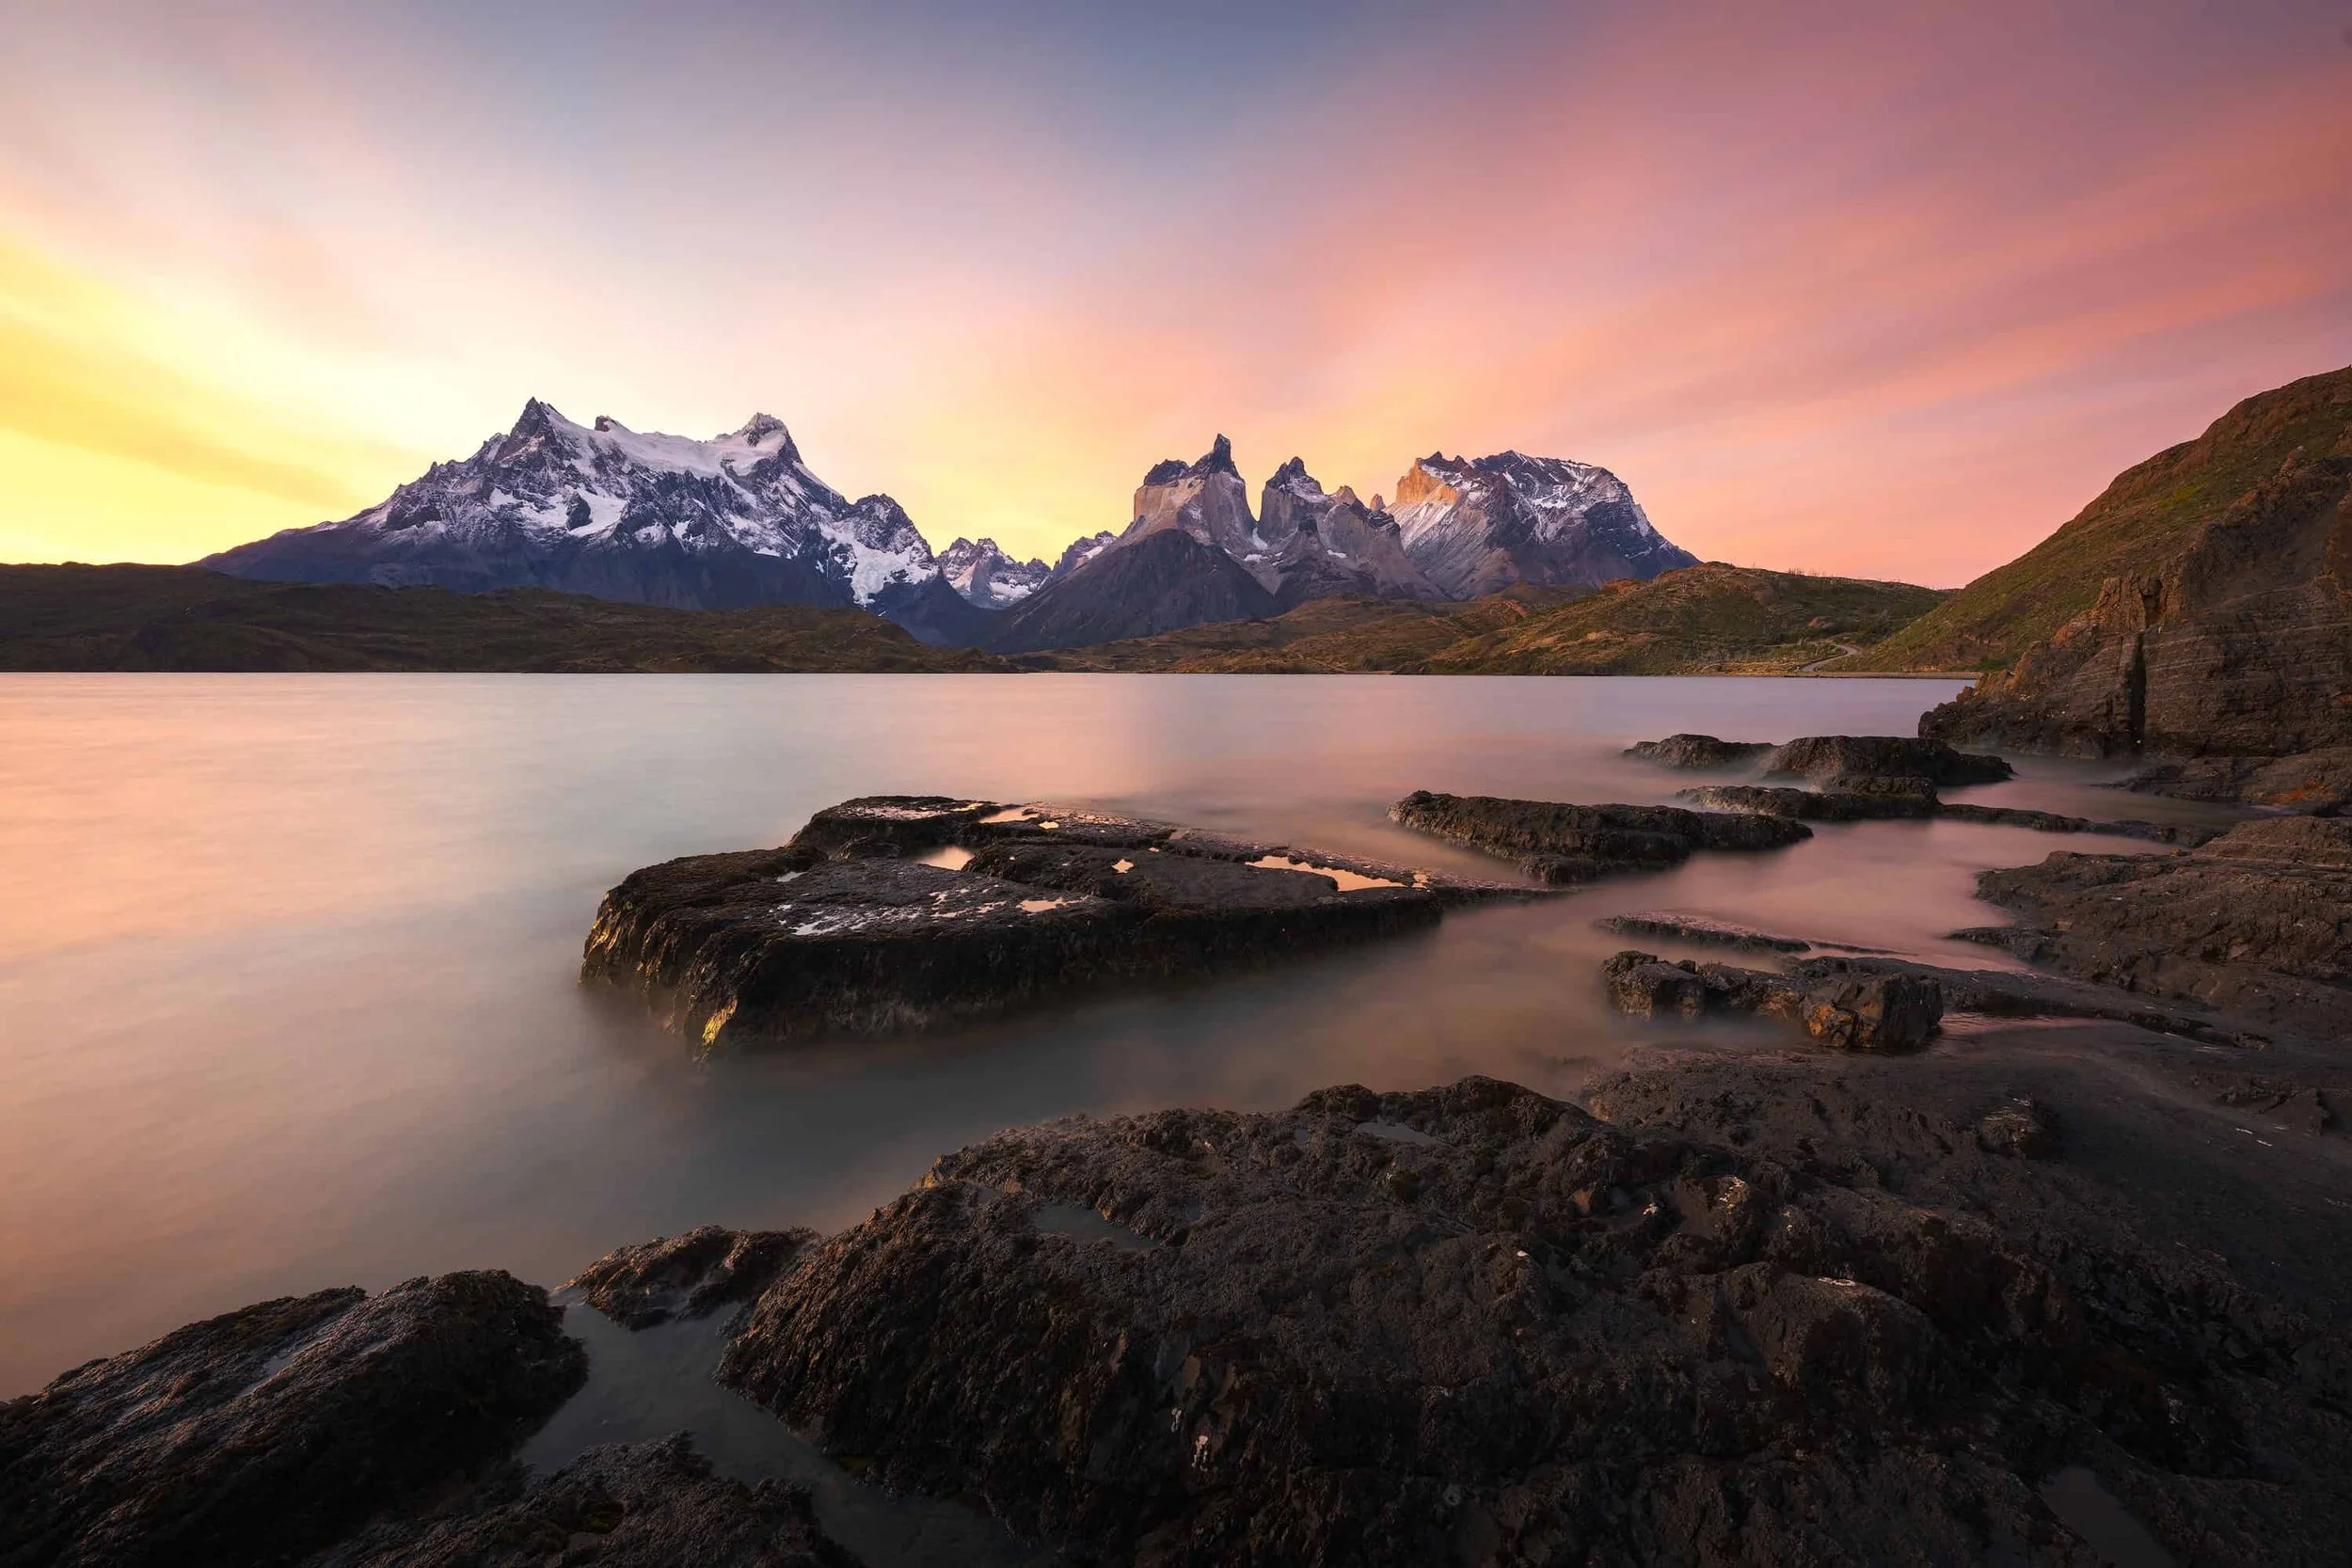
The campground sits directly on the shore of Lago Pehoé with one of the most accessible and photogenic views of the Cuernos del Paine in the entire park. You can shoot from camp itself — particularly powerful in the still mornings when the lake reflects the peaks.
What we shoot here: classic Cuernos reflections in still water, foreground rocks and shoreline detail, panoramic compositions as the light moves across the range. Best light: sunrise. The east-facing peaks catch first light dramatically while the lake holds its glassy reflection (when the wind allows). Autumn note: the autumn vegetation around the lake shore adds warm colour to the foreground. April mornings are often calmer than summer mornings, giving better odds of clean reflections — but Patagonian wind can come up fast, so be ready to shoot the moment the conditions hold. Lenses: 16–35mm for reflections with strong foreground; 24–70mm for cleaner framing; 70–200mm for tighter peak detail.
Salto Grande & the trail to Mirador Nordenskjöld
The waterfall at Salto Grande is worth a short visit, but the real reward here is the trail that begins from the falls and continues to Mirador Nordenskjöld. This walk passes through a series of strong photography opportunities and ends at the closest viewpoint you can reach of the Cuernos del Paine.
The wider area has changed significantly from how it was in the past. Recent fires and the ongoing regrowth have closed off some of the compositions photographers worked here years ago. What's accessible today is the marked trail — and it's still excellent.
What we shoot here: the falls themselves at the start, then a series of opportunities along the trail — lenga and ñire stands, intimate landscape detail, distant peak compositions — finishing at the dramatic open viewpoint of the Cuernos at Mirador Nordenskjöld. Best light: sunrise on the Cuernos is the headline shot at the mirador. The trail itself works well throughout the day in soft or storm-break light. Autumn note: the walk through autumn forest along the trail is a photographic experience in itself. Build in time. Don't rush to the end — the journey is the work. Wildlife note: this is active puma territory. Encounters are rare but possible at dawn and dusk, particularly in the open terrain near the mirador. Guanacos graze openly throughout the area, which is what brings the pumas. Move quietly. Respect distance. A puma sighting is not the goal of a landscape trip, but it's part of what makes this corner of the park feel alive. Lenses: 16–35mm for immersive shots at the falls and panoramic compositions at the mirador; 24–70mm for forest detail and cleaner peak framing; 70–200mm for compressed peak shots and intimate landscape work along the trail.
A note on some images in this section: a few of the photographs shown in this guide from the Salto Grande surroundings are from compositions in areas now closed for regrowth since a few years. They're included to show what the landscape held before — and what we're working to protect for the years it will take to recover.
The Gauchos: Patagonia's working culture

Patagonia is famous for its mountains. But the people who have lived in their shadow for generations are the real soul of the region — and they are some of the most rewarding photographic subjects in the world.
On my April expedition, I arranged a Gaucho session for the group on one of our last days in Torres del Paine. Local Gauchos, their horses, the working gear that's been mended for decades. Twenty minutes of riding through floodwater with the Cuernos in the storm behind them. Some of my favourite frames from the entire trip came from those twenty minutes.
A few notes if you want to include human and cultural elements in your Patagonia photography:
Always arrange sessions through proper channels. Don't approach Gauchos working in the field for a "quick portrait." Speak to local estancias, hotels, or guides who can arrange a respectful, paid session.
Pay properly. This is a real working culture. The session you arrange supports the family.
Photograph honestly. Don't pose them in ways that aren't authentic. The dignity of these portraits matters more than the visual drama.
Spanish helps enormously. Even a few words. The respect this signals goes a long way.
What autumn weather actually means for your gear and your shoot
A practical section.
Wind: Patagonian wind in autumn is no joke. 100+ km/h gusts happen with little warning. Use heavier tripods. Hang your camera bag from the tripod's centre column for ballast. Avoid tall, narrow tripod setups. And know when to put the gear away — no shot is worth losing equipment to wind damage.
Cold: Mornings in April and May at altitude can drop well below freezing. Batteries die faster. Keep spares warm against your body. LCD screens slow down. Plan accordingly.
Wet: Storm fronts arrive quickly. Rain covers for your camera bag and weather sealing for your lenses matter. Microfiber cloths in multiple pockets. Don't change lenses in driving rain or spray.
Daylight hours: in April you have roughly 11-12 hours of daylight. By late May it drops to around 9-10. Plan accordingly. Sunrise shoots in late May can mean leaving camp at 5:30am or later, which is more civilized than the midnight summer departures.
Road conditions: the Ruta 40 in Argentina and the dirt roads through Torres del Paine can deteriorate quickly with autumn rain. Allow extra time. Don't trust your GPS arrival time. Carry a spare tire that actually works.
How to plan a Patagonia photography trip in autumn
Some basics if you're considering this.
When exactly: Early-April through mid-May is my preferred window. Earlier and the lenga colour hasn't fully turned. Later and the days get too short and the weather too volatile. Mid-March is also viable but feels more like late summer than true autumn.
How long: minimum two weeks if you want to do both Los Glaciares and Torres del Paine properly. Three weeks if you want to add Peninsula Valdés or the Carretera Austral. One week is too short — the weather demands flexibility, and you need days in reserve to catch the light when it arrives.
Getting there from Europe: typically a flight to Buenos Aires or Santiago, then a domestic flight to El Calafate or Punta Arenas. Plan a buffer day for delays.
Where to base: El Chaltén for Los Glaciares (or tents at Poincenot if you're doing serious hiking). For Torres del Paine, I've recently been basing groups at Hotel Río Serrano on the western edge of the park — strong location, great access, real comfort after expedition days.
Booking: flights and lodging in autumn are more available than summer, but the best small hotels and lodges still book up months ahead. April-May trips should ideally be booked by September of the previous year.
Photo permits: generally not required for individual photography in the national parks. Commercial shoots are different — check current park regulations.
Final notes from the field
Patagonia in autumn rewards patience and rewards photographers who are willing to be uncomfortable. You will get rained on. You will be cold. You will hike trails that feel longer than they should. And you will, on some days, drive hours to a location only to have the weather turn before you can make the shot you came for.
But when the light arrives — and it does arrive — there's nothing quite like it. The autumn forests glow. The first snow on the peaks catches the rising sun. The wind drops for thirty seconds and the lake goes still. You make a frame you couldn't have planned.
The framework I run through before every shutter press in conditions like these — the four checks that keep my compositions clean even when the world is moving fast — is what I've put together in a free guide.
The Field Method — Four checks I run before every shot in any landscape
A free composition framework for landscape photographers, with worked examples from Patagonia, the Faroe Islands, and beyond. Read in two minutes. Apply in twenty seconds. Use for the rest of your life.
Felix Inden is a landscape photographer and expedition leader based in Germany. PhotoPills Master. Multilingual guiding in German, English, and Spanish. He leads sold-out photography expeditions to Patagonia, the Faroe Islands, Lofoten, Iceland, and the Canadian Rockies.
If you're also considering Nordic locations for your next trip, see the practical guide to winter photography in Lofoten and my Faroe Islands Photography Guide
And if you love Patagonia as much as I do, don't miss my autumn in Patagonia guide.